Restoration Intelligence - Tygart Media

Category: Restoration Intelligence

The definitive resource for restoration company operators — business operations, marketing, estimating, AI, and growth strategy.

  • How to Test for Radon in Your Home: Complete Guide

    How to Test for Radon in Your Home: Complete Guide

    The Distillery
    — Brew № 1 · Radon Mitigation

    Radon testing is the only way to know whether your home has elevated radon levels. You cannot smell it, see it, or detect it with any sense — and the homes with the highest radon levels often show no correlation with geography, age, or construction style. The EPA estimates that 1 in 15 U.S. homes has elevated radon. Testing takes as little as 48 hours and costs $15–$30 for a DIY kit.

    Why You Need to Test

    Radon is the second leading cause of lung cancer in the United States after cigarette smoking, responsible for approximately 21,000 deaths annually according to the EPA. The risk is cumulative — it is the product of concentration and time. A home at 4.0 pCi/L poses roughly the same lifetime lung cancer risk as smoking half a pack of cigarettes per day. A home at 20 pCi/L — not uncommon in high-radon zones — roughly equals smoking two packs per day.

    The only way to know your home’s radon level is to test it. No map, no neighborhood average, and no visual inspection can substitute for a measurement in your specific home.

    Short-Term vs. Long-Term Radon Tests

    Short-Term Tests (2–90 Days)

    Short-term tests are the most commonly used initial screening method. The standard residential short-term test is a charcoal canister test run for 48–96 hours. Results are available within 3–7 business days after mailing the device to a lab.

    • Duration: 48 hours minimum (EPA); 48–96 hours typical for charcoal devices
    • Device type: Activated charcoal canister or electret ion chamber
    • Conditions required: Closed-house conditions (see below)
    • Best for: Initial screening, pre-purchase testing, post-mitigation verification
    • Limitation: A single short-term test captures a snapshot — radon levels fluctuate with barometric pressure, temperature, and season. A short-term result may be higher or lower than the home’s true annual average.

    Long-Term Tests (90+ Days)

    Long-term tests provide a more accurate picture of the home’s actual annual average radon exposure. The standard device is an alpha track detector — a small card with a special plastic film that records radon decay particle tracks over time.

    • Duration: 90 days to 1 year (one year is ideal)
    • Device type: Alpha track detector
    • Conditions required: Normal living conditions (no closed-house protocol)
    • Best for: Confirming short-term results, annual monitoring, determining true annual average
    • Advantage: Averages out seasonal and pressure fluctuations — provides the most accurate basis for mitigation decisions

    EPA guidance: if a short-term test shows between 4.0 and 8.0 pCi/L, conduct a follow-up long-term test or a second short-term test before deciding on mitigation. If the initial short-term test shows 8.0 pCi/L or higher, proceed to mitigation without waiting for a confirmatory test — the risk is sufficient to act immediately.

    Where to Place the Radon Test Device

    Placement determines whether your result is meaningful. The EPA’s placement protocol:

    • Level: Test in the lowest level of the home that is currently used or could be used as living space — even if you do not currently occupy it. If you have an unfinished basement you plan to finish, test there.
    • Location within the room: Place the device in the breathing zone — at least 20 inches above the floor and at least 12 inches from any wall
    • Away from drafts: Do not place near windows, doors, HVAC vents, or exterior walls where air movement can dilute results
    • Away from humidity sources: Do not place near sump pits, laundry areas, or bathrooms — excessive humidity can affect charcoal canister performance
    • Accessible but undisturbed: The device should be able to sit undisturbed for the full test duration — not in a high-traffic area where it might be moved

    Closed-House Conditions

    Short-term tests require closed-house conditions during the test and for 12 hours before the test begins. Closed-house means:

    • All windows and exterior doors closed except for brief normal entry/exit
    • No whole-house fans or attic fans running
    • Normal HVAC operation is permitted (heating and cooling systems can run — they recirculate interior air)
    • Ceiling fans are permitted
    • Fireplace dampers closed (if not in use)

    Closed-house conditions prevent outdoor air from diluting indoor radon to artificially low levels during the test. When conditions are not maintained, short-term results systematically underestimate actual radon levels — exactly the wrong direction for a safety measurement.

    Interpreting Your Results

    • Below 2.0 pCi/L: Below EPA’s average indoor radon level of 1.3 pCi/L if the home is new. No action required; retest in 2 years.
    • 2.0–3.9 pCi/L: Between the national average and the EPA action level. Consider a long-term test to confirm. Some homeowners choose to mitigate at this level regardless, particularly if they have young children or smokers in the home.
    • 4.0–7.9 pCi/L: At or above EPA action level. EPA recommends mitigation. Conduct a confirmatory long-term or second short-term test if time allows, then mitigate.
    • 8.0 pCi/L or higher: Mitigate without waiting for confirmatory testing. At this level the health risk warrants immediate action.

    DIY vs. Professional Testing

    DIY test kits (charcoal canisters or alpha track detectors) purchased from hardware stores or online labs are the most cost-effective option for initial and ongoing screening. Cost: $15–$30 including lab analysis. Most state radon programs recommend purchasing from a lab certified by the National Radon Proficiency Program (NRPP) or National Radon Safety Board (NRSB).

    Professional testing uses the same device types but is conducted and placed by a certified radon measurement professional. Professional testing is required or preferred in specific situations:

    • Real estate transactions where the buyer requires a certified measurement
    • Post-mitigation verification where the mitigator or a warranty requires professional confirmation
    • Rental properties in states where landlord testing requirements specify professional measurement
    • Situations involving litigation or insurance where certified chain-of-custody testing is required

    How Often to Test

    • Initial test: If you have never tested, test now — regardless of when you moved in or how long you have lived there
    • After mitigation: Test within 24 hours of system installation (if using a continuous monitor) or place a short-term test 24+ hours post-installation; run for 48 hours minimum
    • Routine retesting: EPA recommends retesting every 2 years even in mitigated homes — to confirm continued performance and catch new entry pathways from foundation settling or renovation
    • After renovations: Any work that involves the foundation, basement, or significant changes to the HVAC system warrants a new test
    • When buying a home: Always test — or require a recent test result — before closing

    Frequently Asked Questions

    How accurate are DIY radon test kits?

    DIY charcoal canister kits analyzed by NRPP- or NRSB-certified labs are accurate to within ±10–15% under controlled conditions. This is sufficient precision for screening decisions. The larger source of variation is not the device itself but testing conditions — an improperly placed device or violated closed-house conditions introduce more error than the device’s inherent measurement uncertainty.

    What time of year is best to test for radon?

    Winter typically produces higher radon readings than summer — windows are kept closed, stack effect is stronger, and atmospheric pressure patterns tend to draw more soil gas into the home. Testing in winter gives a closer approximation of worst-case conditions. However, because any result at or above 4.0 pCi/L warrants mitigation regardless of season, the best time to test is simply now — not after waiting for an optimal season.

    Can I test for radon myself or do I need a professional?

    DIY testing is appropriate and recommended for the vast majority of homeowners. Purchase a certified short-term or long-term kit, follow the placement and closed-house instructions, and mail to the lab. Professional testing is required only for real estate transactions in some states, post-litigation measurements, or situations where certified chain-of-custody documentation is needed.

    My neighbor’s home tested low — does that mean mine will too?

    No. Radon levels vary dramatically between adjacent homes — sometimes between rooms in the same home. Differences in sub-slab aggregate, foundation type, construction methods, HVAC configuration, and soil permeability can produce completely different radon levels in homes built side by side. Your home must be tested independently.


    Related Radon Resources


  • AI Agents vs Chatbots & Automations: Key Differences

    AI Agents vs Chatbots & Automations: Key Differences

    These terms get used interchangeably. They’re not the same thing. Here’s the actual distinction between each one, where the lines get genuinely blurry, and which category fits what you’re actually trying to build.

    Chatbots

    A chatbot is a software interface designed to simulate conversation. The defining characteristic: it’s stateless and reactive. You send a message; it responds; the exchange is complete. Each interaction is largely independent.

    Traditional chatbots (pre-LLM) operated on decision trees — “if the user says X, respond with Y.” Modern LLM-powered chatbots use language models to generate responses, which makes them dramatically more capable and flexible — but the fundamental architecture is the same: you ask, it answers, you ask again.

    What chatbots are good at: answering questions, providing information, routing conversations, handling defined service scenarios with natural language flexibility. What they’re not: action-takers. A chatbot can tell you how to cancel your subscription. An agent can cancel it.

    Automations

    Automations are rule-based workflows that execute when triggered. Zapier, Make, and similar tools are the canonical examples. When event A happens, do B, then C, then D.

    The key characteristic: the path is predefined. Every step is specified by the person who built the automation. If an unexpected situation arises that the automation wasn’t built for, it either fails or skips the step. There’s no reasoning about what to do — there’s only executing the specified path or not.

    Automations are highly reliable for well-defined, stable processes. They break when edge cases arise that weren’t anticipated. They scale perfectly for the exact task they were built for; they don’t generalize.

    APIs

    An API (Application Programming Interface) is a communication contract — a defined way for software systems to talk to each other. APIs are infrastructure, not agents or automations. They’re the mechanism through which agents and automations take action in external systems.

    When an AI agent “uses Slack,” it’s calling Slack’s API. When an automation “posts to Twitter,” it’s calling Twitter’s API. The API is the door; agents and automations are the things that open it.

    Conflating APIs with agents is a category error. An API is a tool, not a behavior pattern.

    AI Agents

    An AI agent takes a goal and figures out how to accomplish it, using tools available to it, handling unexpected situations along the way, without a human specifying each step.

    The distinguishing characteristics versus the above:

    • vs. Chatbots: Agents take action in the world; chatbots respond to messages. An agent can book the flight, not just tell you how to book it.
    • vs. Automations: Agents reason about what to do next; automations execute predefined paths. When an unexpected situation arises, an agent adapts; an automation fails or skips.
    • vs. APIs: APIs are tools an agent uses; they’re not the agent itself. The agent is the reasoning layer that decides which API to call and what to do with the result.

    Where the Lines Actually Blur

    In practice, real systems often combine these categories:

    LLM-powered chatbots with tool access: A customer service chatbot that can look up your order status, initiate a return, and send a confirmation email is starting to look like an agent — it’s taking actions, not just responding. The boundary between “advanced chatbot” and “limited agent” is genuinely fuzzy.

    Automations with AI decision steps: A Zapier workflow with an OpenAI or Claude step in the middle isn’t purely rule-based anymore — the AI step can produce variable outputs that affect what the automation does next. This is a hybrid: mostly automation, partly agentic.

    Agents with constrained scopes: An agent restricted to a single tool and a narrow task class starts to look like a sophisticated automation. The more constrained the scope, the more the distinction collapses in practice.

    The useful question isn’t “what category is this?” but “is this system reasoning about what to do, or executing a predefined path?” That’s the actual distinction that matters for how you build, monitor, and trust it.

    Why the Distinction Matters Operationally

    Reliability profile: Automations fail predictably — when an edge case hits a path that wasn’t built. Agents fail unpredictably — when their reasoning goes wrong in a way you didn’t anticipate. Different failure modes require different monitoring approaches.

    Maintenance overhead: Automations require explicit updates when processes change. Agents adapt to process changes automatically — but may adapt in unexpected ways that need to be caught and corrected.

    Auditability: Automations are fully auditable — you can read the workflow and know exactly what it does. Agents are less auditable — you can inspect their actions, but not fully predict them in advance. For compliance-sensitive contexts, this matters significantly.

    Build cost: Automations are faster to build for well-defined, stable processes. Agents are faster to deploy when the process is complex, variable, or not fully specified — because you’re specifying a goal rather than a procedure.

    For what agents can actually do in production: What AI Agents Actually Do. For a business owner’s introduction: AI Agents Explained for Business Owners. For hosted agent infrastructure: Claude Managed Agents FAQ.


    Hosted agent infrastructure pricing: Claude Managed Agents Pricing Reference.

  • What AI Agents Do: Real Production Examples Explained

    What AI Agents Do: Real Production Examples Explained

    Not the version where AI agents are going to replace all human jobs by 2030. The actual version, right now, based on what’s deployed in production.

    The Actual Definition

    What an AI agent is

    Software that takes a goal, breaks it into steps, uses tools to execute those steps, handles errors along the way, and keeps working without you directing every action. The distinguishing characteristic is autonomous multi-step execution — not just answering a question, but completing a task.

    The Key Distinction: One-Shot vs. Agentic

    Most people’s experience with AI is one-shot: you type something, the AI responds, the exchange is complete. That’s a language model doing inference. An AI agent is different in one specific way: it takes actions, checks results, and takes more actions based on what it found — often dozens of steps — without you approving each one.

    Example of one-shot AI: “Summarize this document.” You paste the document, the AI returns a summary. Done.

    Example of an AI agent doing the same task: “Research this topic and produce a summary with verified sources.” The agent searches the web, reads multiple pages, identifies conflicts between sources, runs additional searches to resolve them, synthesizes findings, and returns a summary with citations — without you specifying each search query or each page to read. You gave it a goal; it handled the steps.

    What Agents Can Actually Do

    The tools an agent can use define its capability surface. Common tool categories in production agents:

    • Web search: Query search engines and retrieve current information
    • Code execution: Write and run code in a sandboxed environment, use results to inform next steps
    • File operations: Read, write, and modify files — documents, spreadsheets, data files
    • API calls: Interact with external services — CRMs, databases, project management tools, communication platforms
    • Browser control: Navigate web pages, fill forms, extract information
    • Memory: Store and retrieve information across steps within a session, sometimes across sessions

    The combination of these tools is what makes agents capable of genuinely autonomous work. An agent that can search, write code, execute it, check the results, and write findings to a document can complete a research and analysis task that would otherwise require hours of human work — without you steering each step.

    What “Autonomous” Actually Means in Practice

    Autonomous doesn’t mean unsupervised indefinitely. Production agents are typically configured with:

    • Defined scope: The tools the agent can use, the systems it can access, the actions it’s allowed to take
    • Guardrails: Actions that require human confirmation before proceeding — making a payment, sending an email externally, modifying a production database
    • Reporting: Checkpoints where the agent surfaces what it’s done and asks whether to continue

    Autonomy is a dial, not a switch. You set how much the agent handles independently versus checks in. Most production deployments start more supervised and reduce oversight as trust in the agent’s behavior is established.

    Real Production Examples (Not Hypotheticals)

    Concrete examples from confirmed public deployments as of April 2026:

    • Rakuten: Deployed five enterprise Claude agents in one week on Anthropic’s Managed Agents platform — handling tasks across their e-commerce operations including data processing, content tasks, and operational workflows
    • Notion: Background agents that autonomously update workspace pages, synthesize database content, and process meeting notes into structured summaries without manual triggers
    • Sentry: Agents integrated into developer workflows — monitoring error streams, triaging issues, and surfacing relevant context to engineers
    • Asana: Project management agents that update task statuses, synthesize project health, and move work items based on defined triggers

    These are not pilots. These are production systems handling real operational load.

    How They’re Built

    An agent is built from three components:

    1. A language model: The reasoning layer — the part that decides what to do next, interprets tool results, and determines when the task is complete
    2. Tools: The action layer — APIs, code execution environments, file systems, or anything else the model can call to take action in the world
    3. Orchestration: The loop that connects them — manages the sequence of model calls and tool executions, maintains state between steps, handles errors

    Historically, builders had to construct the orchestration layer themselves — a significant engineering investment. Hosted platforms like Claude Managed Agents handle the orchestration layer, letting builders focus on defining the agent’s goals, tools, and guardrails rather than the mechanics of running the loop.

    What Agents Are Not Good At (Yet)

    Honest calibration on current limitations:

    • Long-horizon planning with many unknowns: Agents perform best on tasks with relatively defined scope. Open-ended exploratory work over many days with fundamentally uncertain requirements is still better handled by humans in the loop at each major decision point.
    • Tasks requiring physical world interaction: No production general-purpose physical agent exists. Software agents operating through APIs and interfaces are the current state.
    • Tasks where errors are catastrophic: Agents make mistakes. For any irreversible, high-stakes action — financial transactions, production data modifications, external communications to important relationships — human confirmation steps should remain in the loop.

    For how hosted agent infrastructure works: Claude Managed Agents FAQ. For the difference between agents and chatbots: AI Agents vs. Chatbots, Automations, and APIs. For an SMB-focused explanation: AI Agents Explained for Business Owners.


    For pricing specifics on hosted agent infrastructure: Claude Managed Agents Complete Pricing Reference.

  • Types of Radon Mitigation Systems: A Complete Home Guide

    Types of Radon Mitigation Systems: A Complete Home Guide

    The Distillery
    — Brew № 1 · Radon Mitigation

    There is no single radon mitigation system. There are six primary system types, each designed for specific foundation conditions — and most homes with elevated radon require one primary method plus supplemental sealing. Knowing which system type applies to your home’s foundation eliminates confusion about what a contractor is proposing and whether the approach matches your situation.

    1. Active Sub-Slab Depressurization (ASD)

    Active Sub-Slab Depressurization is the most widely installed radon mitigation system in the United States. It is the standard approach for slab-on-grade homes and basement homes with concrete slab floors.

    How ASD Works

    A suction pipe penetrates the concrete slab, connecting to the aggregate or soil layer beneath. A continuously running electric fan draws air (and with it, radon) from beneath the slab, routing it through PVC pipe to discharge above the roofline. This creates negative pressure in the sub-slab zone relative to the home’s interior — preventing radon from finding pathways through cracks, joints, and penetrations into the living space.

    ASD Applications

    • Slab-on-grade homes (full footprint slab, no basement)
    • Basement homes with concrete slab floors
    • Homes with both a basement and upper-level slab additions
    • Garage slabs connected to the main living area slab

    ASD Governing Standard

    AARST-ANSI SGM-SF (Standard of Practice for Mitigation of Radon in Schools and Large Buildings, adapted for single-family) governs ASD installation requirements including diagnostic testing, pipe sizing, fan placement, and performance verification.

    2. Active Sub-Membrane Depressurization (ASMD)

    Active Sub-Membrane Depressurization is the crawl space equivalent of ASD. Instead of drilling through concrete, the system creates negative pressure beneath a vapor barrier (membrane) installed over the crawl space soil.

    How ASMD Works

    A heavy-duty polyethylene vapor barrier (minimum 6-mil; professional installations use 10–20 mil) is installed across the entire crawl space floor, lapped up foundation walls, and sealed at all edges and penetrations. A suction pipe penetrates the barrier and connects to the soil or aggregate below via a perforated collection mat. The fan draws soil gas from beneath the barrier, routing it above the roofline through the same type of PVC pipe system used in ASD.

    ASMD Requirements

    • Foundation vents must be sealed — open vents allow outdoor air into the crawl space, defeating the sub-membrane vacuum
    • Barrier seams must be lapped (minimum 12″ overlap) and taped
    • Multiple suction points are often needed — crawl spaces typically require 2–4 collection points versus the 1–2 typical in ASD installations
    • AARST-ANSI RMS-LB governs ASMD installation standards

    3. Drain-Tile Depressurization

    Many basement homes — particularly those built after 1980 — were constructed with a drain-tile system: a perforated pipe network running around the interior or exterior perimeter of the foundation, at or below the footing level, designed to channel groundwater to a sump pit. This drain tile can serve as a highly effective radon collection network.

    How Drain-Tile Depressurization Works

    When a sump pit is present and the drain tile is functional, the mitigator creates suction at the sump pit — either by sealing the pit with an airtight lid and connecting a fan, or by installing a dedicated suction pipe into the drain tile network. Because the drain tile runs around the full foundation perimeter, a single suction point at the sump can create negative pressure across a very large area — often the entire foundation footprint without any slab drilling.

    Advantages Over Standard ASD

    • No slab drilling required (the drain tile network is already in place)
    • Often achieves better sub-foundation coverage than a single slab core hole
    • Sump pit is already present — lid modification is the primary work
    • Lower installation cost when drain tile is accessible

    Limitations

    • Requires a confirmed functional drain-tile system — older or poorly maintained tile may be silted or blocked
    • Not present in all homes — many older homes and slab-on-grade construction have no drain tile
    • May need to be supplemented with slab suction point(s) if tile coverage is incomplete

    4. Block-Wall Depressurization

    Concrete masonry unit (CMU) block foundation walls have hollow cores that communicate directly with the soil — a significant secondary radon entry pathway in older homes. Block-wall depressurization addresses this specifically.

    How Block-Wall Depressurization Works

    Small holes (2″–3″ diameter) are drilled through the interior face of the CMU block wall, typically just above the slab level, at 6–8 foot intervals around the affected perimeter. PVC pipe connects these holes, manifolding into the main ASD fan system or a dedicated fan. The fan draws radon from inside the block core cavities before it can migrate through mortar joints and wall cracks into the basement air.

    When Block-Wall Depressurization Is Needed

    • Post-mitigation testing still shows levels above 4.0 pCi/L after standard ASD is installed
    • Visual inspection reveals significant efflorescence, spalling, or moisture infiltration through block walls (indicating active soil gas pathways)
    • Home is pre-1975 CMU construction with no poured concrete wall facing

    Block-wall depressurization is almost always an add-on to ASD, not a standalone system. Cost: $300–$600 in additional materials and labor when added to an existing ASD installation.

    5. Heat Recovery Ventilator (HRV) or Energy Recovery Ventilator (ERV)

    HRV and ERV systems are whole-house mechanical ventilation systems that exchange stale indoor air with fresh outdoor air while recovering heat (HRV) or both heat and moisture (ERV). They are sometimes used as a radon reduction strategy — primarily in situations where other methods are impractical or as a supplemental approach.

    How HRV/ERV Reduces Radon

    By continuously introducing fresh outdoor air into the home, HRV/ERV dilutes indoor radon concentrations. They also reduce the negative pressure differential that draws radon into the home from the soil, because they balance indoor and outdoor pressure rather than allowing the home to depressurize relative to the soil.

    Limitations as Radon Mitigation

    • Less reliable reduction than ASD/ASMD — radon dilution depends on outdoor air exchange rate, and results vary significantly by climate and home tightness
    • Higher operating cost — HRV/ERV units consume 100–400 watts versus 20–90 watts for a radon fan
    • Does not address the root cause (radon entry from soil) — only dilutes after entry
    • Not accepted as primary mitigation in all state radon programs
    • Best suited as supplemental to ASD in homes where additional air quality improvement is also desired

    EPA and AARST consider ASD/ASMD the preferred primary mitigation method. HRV/ERV may be appropriate as supplemental mitigation or in unusual foundation situations where ASD is genuinely impractical.

    6. Natural Ventilation Enhancement

    Natural ventilation — opening windows, operating exhaust fans, increasing air exchange — can temporarily reduce radon concentrations. It is not a mitigation system and is not recommended by EPA or AARST as a radon control strategy for several reasons:

    • Effective only while windows are open — unpractical in most U.S. climates for the majority of the year
    • Increases heating and cooling costs significantly
    • Can create negative pressure that worsens radon entry
    • Provides no permanent solution

    Natural ventilation may be used as a short-term measure while a permanent system is being installed, but it is not a substitute for ASD, ASMD, or other mechanical systems.

    Choosing the Right System: Decision Guide

    Foundation Type Primary System Common Add-On
    Slab-on-grade ASD Sealing (cracks, joints)
    Basement — poured concrete ASD Drain-tile depressurization if sump present
    Basement — CMU block walls ASD Block-wall depressurization
    Crawl space — vented ASMD (with encapsulation) Foundation vent sealing
    Crawl space — encapsulated ASMD Additional suction points if needed
    New construction (RRNC) Passive pipe (fan-ready) Fan activation if post-construction test elevated
    Combination foundation ASD + ASMD (separate systems or manifolded) Sealing at transition zones

    Frequently Asked Questions

    What is the most common type of radon mitigation system?

    Active Sub-Slab Depressurization (ASD) is the most commonly installed radon mitigation system in the U.S. It applies to slab-on-grade and basement homes — the two most prevalent residential foundation types. For crawl space homes, Active Sub-Membrane Depressurization (ASMD) is the standard.

    Can one system work for multiple foundation types in the same home?

    Yes, but it typically requires separate or manifolded systems. A home with a basement and a slab-on-grade addition, for example, may need ASD suction points in both zones, connected to a single fan via manifold pipe — or two separate fans if the zones are not contiguous. An experienced mitigator will design for the full footprint, not just the primary foundation type.

    Does the type of radon system affect the cost?

    Yes, significantly. A standard single-point ASD in a poured concrete basement is the least expensive ($800–$1,500). Adding drain-tile depressurization at the sump typically adds $100–$300. Block-wall depressurization adds $300–$600. ASMD with full crawl space encapsulation can run $2,500–$5,000+ depending on crawl space size and membrane quality.

    What type of radon system works in a home with no basement and no crawl space?

    Slab-on-grade homes use ASD — a suction pipe drilled through the concrete slab connects to the aggregate beneath. Interior routing typically runs through a garage wall or utility closet to the attic. Exterior routing is an alternative when interior access is limited. The challenge in slab homes is pipe routing to above the roofline without a basement or crawl space to work through — but it is fully achievable in almost all cases.

    What is the difference between ASD and ASMD?

    Both use a fan to create negative pressure below the home’s floor system. ASD drills through a concrete slab and draws suction from the sub-slab aggregate or soil. ASMD installs a vapor barrier over the crawl space soil and draws suction from beneath the barrier — no concrete is present to drill through. The fan, pipe, and discharge components are identical; only the suction connection method differs.

  • Claude Managed Agents vs. OpenAI Agents API — A Direct Comparison

    Claude Managed Agents vs. OpenAI Agents API — A Direct Comparison

    TL;DR — Pick one in 30 seconds

    Choose Claude Managed Agents for zero-infra, fast production deployment. Choose OpenAI Agents API if you need multi-model flexibility or already run on OpenAI infrastructure.

    Feature Claude Managed Agents OpenAI Agents API
    Model lock-inClaude onlyGPT-4o, o3 — OAI only
    Setup complexityZero infra — fully managedSDK — you build the harness
    MemoryBuilt-in (public beta, May 2026)Manual via vector DB
    MultiagentNative (lead + specialists)Swarm/SDK patterns
    Pricing$0.08/session-hr + tokensToken-only (no session fee)
    Best forFast production, Claude-nativeMulti-model, existing OAI infra

    Model Accuracy Note — Updated May 2026

    Current flagship: Claude Opus 4.7 (claude-opus-4-7). Current models: Opus 4.7 · Sonnet 4.6 · Haiku 4.5. Claude Opus 4.6 referenced in this article has been superseded. See current model tracker →

    Tygart Media Strategy
    Volume Ⅰ · Issue 04Quarterly Position
    By Will Tygart
    Long-form Position
    Practitioner-grade

    You’re evaluating hosted agent infrastructure. Both Anthropic and OpenAI have one. Before you commit to either, here’s what’s actually different — not the marketing version, the architectural and pricing version.

    Bottom Line Up Front

    If your stack is Claude-native and you want to get to production fast without building orchestration infrastructure, Managed Agents is hard to beat. If you need multi-model flexibility or have OpenAI deeply embedded in your stack, the calculus changes. Lock-in is real on both sides.

    Still Deciding?

    I’ve run both. Email me your use case and I’ll tell you which one fits.

    No pitch. If Claude isn’t the right call for what you’re building, I’ll tell you that too.

    Email Will → will@tygartmedia.com

    What Each Product Is

    Four-step loop: observe, remember, act, update for managed agents
    What each agents product is.

    Claude Managed Agents

    Anthropic’s hosted runtime for long-running Claude agent work. You define an agent (model, system prompt, tools, guardrails), configure a cloud environment, and launch sessions. Anthropic handles sandboxing, state management, checkpointing, tool orchestration, and error recovery. Launched April 8, 2026 in public beta.

    OpenAI Agents API

    OpenAI’s hosted agent infrastructure layer, launched earlier in 2026. Provides similar capabilities: hosted execution, tool integration, multi-agent coordination. Supports multiple OpenAI models (GPT-4o, o1, o3, etc.).

    Model Flexibility

    Three cards: coding depth, latency first, agent reliability
    Model flexibility compared.

    Managed Agents: Claude models only. Sonnet 4.6 and Opus 4.6 are the primary options for agent work. No multi-model mixing within the managed infrastructure.

    OpenAI Agents API: OpenAI models only, but a wider current model lineup (GPT-4o, o1, o3-mini depending on task). Also Claude-only within its own ecosystem — not multi-model in the cross-provider sense.

    The practical implication: If your evaluation is “I want the best model for this specific task regardless of provider,” neither hosted solution gives you that. Both lock you to their provider’s models. The multi-model comparison matters for self-hosted frameworks (LangChain, etc.), not for managed hosted solutions.

    Pricing Structure

    Claude Managed Agents: Standard Claude token rates + $0.08/session-hour of active runtime. Idle time doesn’t bill. Code execution containers included in session runtime — not separately billed.

    OpenAI Agents API: Standard OpenAI token rates + usage-based tooling costs. Pricing structure varies by tool and model tier. Verify current rates at OpenAI’s pricing page — rates have changed multiple times as their agent products have evolved.

    Direct comparison difficulty: Without modeling the same specific workload against both providers’ current rates, headline comparisons mislead. Token rates differ by model, model capabilities differ, and “session runtime” isn’t a category OpenAI uses. Model the workload, not the headline number.

    Infrastructure and Lock-In

    Both solutions create meaningful lock-in. This isn’t a criticism — it’s an honest description of the trade-off you’re making:

    Claude Managed Agents lock-in: Your agents run on Anthropic’s infrastructure with their tools, session format, sandboxing model, and checkpointing. Migrating to OpenAI’s Agents API or self-hosted infrastructure requires rearchitecting session management, tool integrations, and guardrail logic. One developer’s reaction at launch: “Once your agents run on their infra, switching cost goes through the roof.”

    OpenAI Agents API lock-in: Symmetric. Same dynamic in reverse. OpenAI’s session format, tool integration patterns, and infrastructure assumptions create equivalent switching costs to move to Anthropic’s platform.

    The honest framing: You’re not choosing “open” vs. “locked.” You’re choosing which provider’s lock-in you’re more comfortable with, given your existing infrastructure, model preferences, and vendor relationship.

    Data Sovereignty

    Five security domains: identity, data, code governance, audit, agents
    Data sovereignty differences.

    Both solutions run your data on provider-managed infrastructure. Neither currently offers native on-premise or multi-cloud deployment for the managed hosted layer. For companies with strict data sovereignty requirements, this is a parallel constraint on both platforms — not a differentiator.

    Production Track Record

    Claude Managed Agents: Launched April 8, 2026. Production users at launch: Notion, Asana, Rakuten (5 agents in one week), Sentry, Vibecode, Allianz. Anthropic’s agent developer segment run-rate exceeds $2.5 billion.

    OpenAI Agents API: Earlier launch gives more time in production, but the product has been revised significantly since initial release. Longer production history, but also more legacy architectural assumptions baked in.

    When to Choose Claude Managed Agents

    • Your stack is already Claude-native (you’re using Sonnet or Opus for most model calls)
    • You want to reach production without building orchestration infrastructure
    • Your tasks are long-running and asynchronous — the session-hour model fits naturally
    • The Notion, Asana, or Sentry integrations are relevant to your workflow
    • You want Anthropic’s specific safety and reliability guarantees

    When to Consider OpenAI’s Agents API Instead

    • Your stack is already heavily OpenAI-integrated (GPT-4o for primary model work, existing tool integrations)
    • You need access to reasoning models (o1, o3) for specific task types — Anthropic’s equivalent is Claude’s extended thinking, which has different characteristics
    • The specific tool integrations in OpenAI’s ecosystem are better matched to your stack
    • You want more production time at scale before committing to a platform

    When to Use Neither (Self-Hosted Frameworks)

    LangChain, LlamaIndex, and similar self-hosted frameworks remain viable — and better — when you genuinely need multi-model flexibility, on-premise execution, or tighter loop control than either hosted solution provides. The trade-off is engineering effort: months of infrastructure work that Managed Agents or OpenAI’s API eliminates.

    Complete pricing breakdown: Claude Managed Agents Pricing Reference. All Managed Agents questions: FAQ Hub. Enterprise deployment example: Rakuten: 5 Agents in One Week.

  • Radon-Resistant New Construction: Complete RRNC Guide

    Radon-Resistant New Construction: Complete RRNC Guide

    The Distillery
    — Brew № 1 · Radon Mitigation

    The lowest-cost and most effective time to address radon in a home is during construction — before the slab is poured, before walls are framed, before any remediation work is necessary. New construction radon mitigation installs a passive system (pipe, no fan) that can be activated with a fan at any future point for roughly $200–$400. Doing this same work after construction costs $800–$2,500 and requires drilling through finished concrete and routing pipe through finished walls.

    What Is Radon-Resistant New Construction (RRNC)?

    Radon-Resistant New Construction (RRNC) is a set of EPA-recommended building practices that minimize radon entry into new homes and create infrastructure for easy mitigation activation if post-construction testing reveals elevated levels. The EPA first published RRNC guidance in the 1990s; AARST-ANSI standard RRNC-2022 provides the current comprehensive technical requirements.

    RRNC is not a complete radon mitigation system. It is a passive infrastructure that makes active mitigation fast and inexpensive if needed. Think of it as a pre-wired electrical box: the capacity is built in, but you turn on power when you confirm you need it.

    Is RRNC Required by Building Code?

    RRNC requirements vary by state and municipality:

    • States with mandatory RRNC: Several states in EPA Radon Zone 1 (highest risk) require RRNC for all new residential construction. These include portions of Colorado, Iowa, Montana, North Dakota, South Dakota, and others.
    • States with voluntary or conditional RRNC: Many states adopt the International Residential Code (IRC) which includes RRNC provisions as a recommended (not mandatory) section. Some counties and municipalities within these states mandate RRNC independently.
    • States with no RRNC requirement: Builders in these areas may or may not include RRNC voluntarily.

    Regardless of legal requirement, the EPA recommends RRNC for all new construction — the incremental cost during construction is $350–$700 versus $800–$2,500+ for post-construction installation.

    The Four Core RRNC Components

    Per EPA RRNC guidance and AARST-ANSI RRNC-2022, a complete passive RRNC system consists of four elements.

    1. Gas-Permeable Layer

    A 4-inch layer of clean 3/4″ gravel (or equivalent gas-permeable material) placed beneath the slab across the entire footprint. This aggregate layer allows soil gases — including radon — to move freely beneath the slab toward the suction point rather than being forced through the concrete itself.

    Some jurisdictions allow alternative gas-permeable materials (certain drainage mats, for example) in lieu of gravel. The gravel layer also serves as drainage and supports the slab from below, so it has structural benefit regardless of radon.

    2. Plastic Sheeting (Vapor Barrier)

    A continuous layer of minimum 6-mil polyethylene sheeting placed over the gas-permeable gravel layer, beneath the concrete slab. The vapor barrier:

    • Prevents soil moisture from wicking up into the slab
    • Serves as a secondary barrier reducing radon and other soil gas migration through the slab
    • Laps up the interior foundation walls and seals at all penetrations

    The sheeting must be continuous — seams lapped a minimum of 12 inches and taped, penetrations sealed — before the concrete pour. Any gap becomes a permanent bypass that undermines both moisture and radon control.

    3. Vent Pipe

    A 3-inch or 4-inch PVC schedule 40 vent pipe is installed through the vapor barrier and slab during construction, routed through the building to terminate above the roof. This is the passive vent pipe that:

    • Runs from the sub-slab gravel layer up through the home’s interior (often inside the wall system or through a designated chase)
    • Connects to the exterior atmosphere above the roofline, providing passive thermal-draft ventilation of soil gases
    • Terminates with a cap that prevents precipitation and pest entry while allowing airflow

    The passive pipe alone — without a fan — can reduce radon by 30–50% in homes with favorable conditions (strong thermal draft, good aggregate, well-sealed slab). But it is not reliable as a sole mitigation strategy. Its primary value is as fan-ready infrastructure.

    4. Electrical Outlet in Attic or Near Fan Location

    An electrical junction box or outlet is installed in the attic (or wherever the future fan will be mounted) during initial construction. This ensures that activating the system with a radon fan requires only connecting the fan — no electrical work, no running new circuits through finished walls.

    This electrical prep step is frequently skipped by builders who are unfamiliar with RRNC or trying to minimize cost. When skipped, future fan activation requires an electrician to run a new circuit to the attic — adding $150–$400 to the activation cost.

    Passive-to-Active Conversion: Activating the System

    When post-construction radon testing shows levels at or above 4.0 pCi/L (EPA action level), or when a homeowner wants to reduce levels proactively, the passive RRNC system is activated by adding a radon fan. This is the simplest radon mitigation work available:

    • The existing passive pipe is already routed from sub-slab to above roofline
    • A radon fan is installed in the pipe run — typically in the attic between the riser and the discharge — and connected to the pre-installed electrical outlet
    • The installation takes 1–2 hours and costs $200–$500 in labor plus the fan ($100–$300)
    • A system performance indicator (manometer) is installed on the visible portion of the pipe inside the home
    • Post-activation radon testing confirms results

    Compare this to a full post-construction installation ($800–$2,500, 4–8 hours of labor) to understand why RRNC is consistently recommended by EPA, AARST, and every state radon program.

    RRNC in Crawl Space Homes

    For new construction homes with crawl spaces, RRNC provisions differ from slab/basement applications:

    • Vapor barrier: A 6-mil (minimum) polyethylene barrier is installed over the crawl space floor during construction, lapped up foundation walls and sealed at all penetrations
    • Vent pipe: A 3″–4″ PVC pipe penetrates the vapor barrier and routes through the home to above the roof — same passive vent function as the slab installation
    • Crawl space vents: AARST RRNC-2022 allows either vented or encapsulated crawl space design — the RRNC vent pipe infrastructure accommodates both

    Testing After Construction

    AARST and EPA recommend testing a new home for radon after occupancy, even if RRNC was implemented during construction. Reasons:

    • RRNC reduces radon entry but does not guarantee levels below 4.0 pCi/L — soil conditions and construction variations affect results
    • Passive-only systems may not achieve sufficient reduction in high-radon-zone homes without fan activation
    • Post-construction testing establishes a baseline for comparison if the home is later modified (addition, basement finish)

    The EPA recommends testing new homes after at least 60 days of occupancy under normal living conditions (closed house not required for initial new construction testing, as 60 days of normal occupancy provides sufficient averaging).

    Working with Builders: What to Specify

    If you are purchasing or building a new home and want to ensure RRNC is included:

    • Add RRNC to the contract as a line item — “Installation of passive radon vent system per EPA RRNC guidance and AARST-ANSI RRNC-2022”
    • Specify 10-mil or 20-mil vapor barrier (beyond the 6-mil minimum)
    • Confirm the electrical outlet in the attic is included
    • Request documentation at closing: vent pipe location, where it terminates, and outlet location
    • Ask whether the jurisdiction requires a permit for the RRNC installation and confirm the builder will obtain it

    Builders who have not done RRNC before may resist or underestimate the requirement. Having the AARST-ANSI RRNC-2022 standard number in the contract gives you a reference document that defines exactly what is required.

    Frequently Asked Questions

    What does RRNC stand for in radon mitigation?

    RRNC stands for Radon-Resistant New Construction. It refers to a set of EPA-recommended building practices that install passive radon vent infrastructure during home construction — before the slab is poured — making future radon fan activation fast and low-cost if post-construction testing shows elevated levels.

    How much does RRNC cost during new construction?

    RRNC during construction typically costs $350–$700 as a builder add-on. This includes the gas-permeable gravel layer (often already planned for structural reasons), vapor barrier (often already in the plans), vent pipe installation, and electrical outlet in the attic. Compare this to $800–$2,500 for post-construction installation.

    Does a passive RRNC system reduce radon by itself?

    Passive systems (no fan) can reduce radon 30–50% through thermal draft — warm air rising through the pipe creates natural suction. But passive systems are not reliable as sole mitigation — the thermal draft effect varies with outdoor temperature, wind, and internal building pressure. If post-construction testing shows levels above 4.0 pCi/L, fan activation is recommended.

    If I buy a new home with RRNC, do I need to test for radon?

    Yes. RRNC reduces radon entry probability but does not guarantee levels below the EPA action level of 4.0 pCi/L. Test after at least 60 days of occupancy under normal living conditions. If levels are at or above 4.0 pCi/L, activate the system by adding a fan — a 1–2 hour installation that costs $300–$800 total.

    Can RRNC be added to a home after construction has started?

    Partially. If the slab has not yet been poured, the gravel layer, vapor barrier, and pipe penetration through the slab can still be completed. If the slab is poured but walls are not yet framed, the vent pipe can still be routed through wall framing before drywall. Once walls are finished, full RRNC infrastructure cannot be added — the installation becomes a standard post-construction retrofit.

  • Claude Managed Agents — Complete Pricing Reference + Dreaming Update (May 2026)

    Claude Managed Agents — Complete Pricing Reference + Dreaming Update (May 2026)

    Last refreshed: May 15, 2026

    May 2026 Update — Dreaming Feature + Beta Status

    Anthropic introduced Dreaming at Code w/ Claude (May 6, 2026) — a new Managed Agents capability where agents review their own session history overnight to improve future performance. Harvey (legal AI) reported a roughly 6× task completion rate increase after implementing it. Dreaming is developer-access preview only. Multiagent Orchestration and Outcomes are now in public beta. See the new Dreaming section below.

    What Is Claude Managed Agents? (Current Status, May 2026)

    Four-step loop: observe, remember, act, update for managed agents
    What Claude Managed Agents is right now.

    Claude Managed Agents is Anthropic’s framework for long-running, stateful AI agents — agents that can maintain context across sessions, hand off between sub-agents, and now, improve themselves by reviewing their own work history. Here’s the current status of each component:

    Component Status Who Has Access
    Multiagent Orchestration Public Beta All API developers
    Outcomes Public Beta All API developers
    Dreaming Developer Preview Selected developers only

    Dreaming: The Feature the Press Mostly Missed

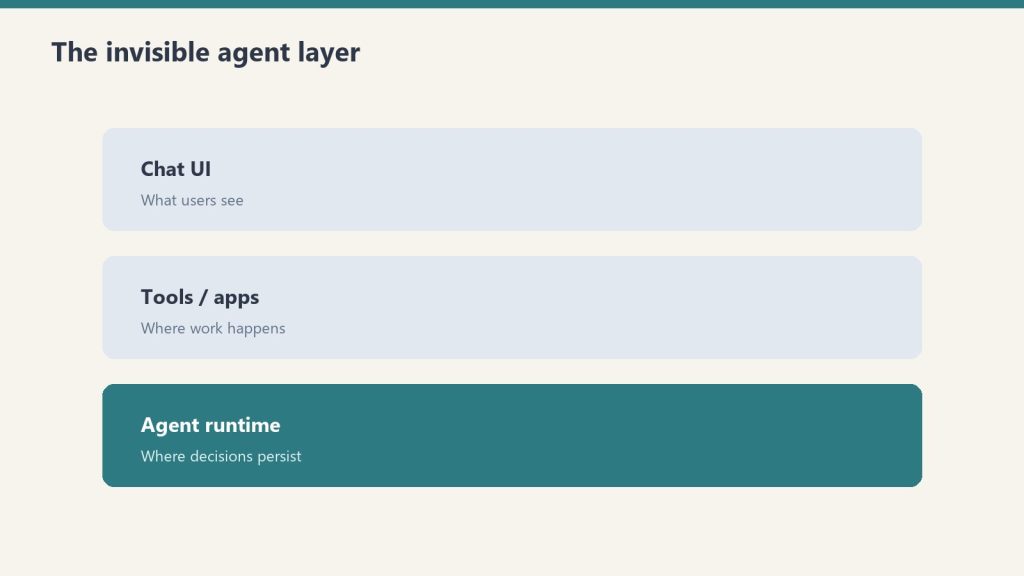
    Three stacked layers: chat UI, tools, agent runtime
    Dreaming — the feature the press mostly missed.

    Announced at Code w/ Claude on May 6, 2026, Dreaming is a Managed Agents capability that lets agents review and reorganize their own memory between sessions. The mechanism:

    1. After a session ends, the agent reads its existing memory store alongside the session transcripts
    2. It produces a new, reorganized memory store: duplicates merged, stale entries replaced, new patterns surfaced
    3. The next session starts with a higher-quality knowledge base — capturing insights no single session could hold

    This is meaningfully different from simply persisting conversation history. The agent isn’t just remembering what happened — it’s synthesizing what it learned. Think of it as the difference between taking notes and actually reviewing and reorganizing your notes the next morning.

    The Harvey Result

    Harvey, the legal AI company, reported approximately a 6× task completion rate increase after implementing Dreaming in their Managed Agents workflow. Harvey’s use case — complex legal research that spans multiple sessions with evolving context — is exactly the kind of work Dreaming was designed for. Sessions build on each other rather than starting fresh each time.

    Dreaming is developer-access preview as of May 2026. Docs: platform.claude.com/docs/en/managed-agents/dreams.

    What Dreaming Is Not

    A few clarifications worth making explicit:

    • Dreaming is not available to end users — it’s a developer-layer capability requiring implementation
    • It’s not persistent memory in the claude.ai chat interface
    • It’s not available to free or standard Pro subscribers through any interface
    • It’s a developer preview, not GA — expect it to evolve before full release

    Our Take: Why This Architecture Matters

    We run Managed Agents in our own Cowork workflows. The Dreaming announcement is the first time Anthropic has shipped something that resembles how expert human knowledge actually compounds over time — not by accumulating raw notes, but by periodically synthesizing and reorganizing what’s been learned into a cleaner structure.

    The Harvey 6× result is a real-world data point from a production legal AI workflow. That’s not a benchmark number — it’s a deployed system showing measurable improvement from session-to-session memory refinement. Whether that 6× figure holds across different use cases is unknown, but the direction of the effect is the signal: agents that learn from their own history outperform agents that don’t.

    For non-developer users watching this space: Dreaming is the preview of what agentic AI will look like when it becomes mainstream. The groundwork being laid now in developer preview will eventually surface in subscription-tier products.

    Model Accuracy Note — Updated May 2026

    Current flagship: Claude Opus 4.7 (claude-opus-4-7). Current models: Opus 4.7 · Sonnet 4.6 · Haiku 4.5. Claude Opus 4.7 (claude-opus-4-7) is the current flagship as of April 16, 2026. Where this article references Opus 4.6 or earlier models, those references are historical. See current model tracker →. See current model tracker →

    Tygart Media Strategy
    Volume Ⅰ · Issue 04Quarterly Position
    By Will Tygart
    Long-form Position
    Practitioner-grade

    You opened this tab because you need a number you can actually use. Not a vibe, not “it depends.” A real pricing breakdown you can put in a spreadsheet, a budget request, or a Slack message to your CTO.

    This is that page. Every pricing variable for Claude Managed Agents in one place, verified against Anthropic’s current documentation as of April 2026. Bookmark it. The beta will update; so will this.

    Quick Reference: The Formula

    Total Cost = Token Costs + Session Runtime ($0.08/hr) + Optional Tools
    Session runtime only accrues while status = running. Idle time is free.

    The Two Cost Dimensions

    Workshop fuel gauge and metal tokens pouring into an API hopper, metaphor for pay-per-token pricing
    Two cost dimensions — stale-proof framing.

    Claude Managed Agents bills on exactly two dimensions: tokens and session runtime. Every pricing question you have collapses into one of these two buckets.

    Dimension 1: Token Costs

    These are identical to standard Claude API pricing. You pay the same rates you’d pay calling the Messages API directly. No Managed Agents markup on tokens. Current rates for the models most commonly used in agent work:

    • Claude Sonnet 4.6: ~$3/million input tokens, ~$15/million output tokens
    • Claude Opus 4.7: higher rates apply — check platform.claude.com/docs/en/about-claude/pricing for current figures
    • Prompt caching: same multipliers as standard API — cache hits dramatically reduce input token costs on long sessions with stable system prompts

    The implication: a token-heavy agent with a large system prompt that runs the same context repeatedly benefits significantly from prompt caching, and that benefit carries over unchanged into Managed Agents.

    Dimension 2: Session Runtime — $0.08/Session-Hour

    This is the Managed Agents-specific charge. You pay $0.08 per hour of active session runtime, metered to the millisecond.

    The critical word is active. Runtime only accrues while your session’s status is running. The following do not count toward your bill:

    • Time spent waiting for your next message
    • Time waiting for a tool confirmation
    • Idle time between tasks
    • Rescheduling delays
    • Terminated session time

    This is not how you’d bill a virtual machine. It’s closer to how AWS Lambda bills — you pay for execution, not reservation. An agent that “runs” for 8 hours but spends 6 of those hours waiting on human input has a very different bill than one running continuous autonomous loops.

    Optional Tool Costs

    Web Search: $10 per 1,000 Searches

    If your agent uses web search, each search costs $10/1,000 — that’s $0.01 per search. For most agents, this is negligible. For a research agent running hundreds of searches per session, it becomes a line item worth modeling separately.

    Code Execution: Included in Session Runtime

    Code execution containers are included in your $0.08/session-hour charge. You’re not separately billed for container hours on top of session runtime. This is explicitly stated in Anthropic’s docs and represents meaningful savings versus provisioning your own compute.

    Worked Cost Examples

    Example 1: Daily Research Agent

    Runs once per day. 30 minutes of active execution. Processes 10 documents, outputs a summary report. Moderate token volume.

    • Session runtime: 0.5 hrs × $0.08 = $0.04/day (~$1.20/month)
    • Tokens (estimate): 50K input + 5K output with Sonnet 4.6 = ~$0.23/run (~$7/month)
    • Total: ~$8–10/month

    Example 2: Weekly Batch Content Pipeline

    Runs 3x/week. 2-hour active sessions. Processes multiple documents, generates structured outputs.

    • Session runtime: 2 hrs × $0.08 × 12 sessions/month = $1.92/month
    • Tokens: depends on content volume — typically $10–40/month
    • Total: ~$12–42/month

    Example 3: Customer Support Agent (Business Hours)

    Active during business hours, handling tickets. 8 hours/day active, 5 days/week.

    • Session runtime: 8 hrs × $0.08 × 22 days = $14.08/month in runtime
    • Tokens: highly variable by ticket volume — the dominant cost driver at scale
    • Runtime cost alone: ~$14/month — tokens are likely 5–20x this depending on volume

    Example 4: 24/7 Always-On Agent

    The maximum theoretical runtime exposure. Continuous operation, no idle time.

    • Session runtime: 24 hrs × $0.08 × 30 days = $57.60/month
    • In practice, no agent has zero idle time — real cost will be lower
    • Token costs at this scale become the dominant factor by a wide margin

    Anthropic’s Official Example (from their docs)

    A one-hour coding session using Claude Opus 4.7 consuming 50,000 input tokens and 15,000 output tokens: session runtime = $0.08. With prompt caching active and 40,000 of those tokens as cache reads, the token costs drop significantly. The runtime charge stays flat at $0.08 regardless of caching.

    What’s Not Billed in Managed Agents

    A few things that might seem like costs but aren’t:

    • Infrastructure provisioning: Anthropic handles hosting, scaling, and monitoring at no additional charge
    • Container hours: Explicitly not separately billed on top of session runtime
    • State management and checkpointing: Included in the session runtime charge
    • Error recovery and retry logic: Anthropic’s infrastructure problem, not yours

    Rate Limits

    Managed Agents has specific rate limits separate from standard API limits:

    • Create endpoints: 60 requests/minute
    • Read endpoints: 600 requests/minute
    • Organization-level limits still apply
    • For higher limits, contact Anthropic enterprise sales

    How to Access Managed Agents Pricing

    Managed Agents is available to all Anthropic API accounts in public beta. No separate signup, no premium tier gate. You need the managed-agents-2026-04-01 beta header in your API requests — the Claude SDK adds this automatically.

    For high-volume agent applications, Anthropic’s enterprise sales team negotiates custom pricing arrangements. Contact them at [email protected] or through the Claude Console.

    The Pricing Signals Worth Noting

    Anthropic recently ended Claude subscription access (Pro/Max) for third-party agent frameworks, requiring those users to switch to pay-as-you-go API pricing. This signals a deliberate strategy: consumer subscriptions are for human-paced interactions; agent workloads route through the API. The $0.08/session-hour rate exists in that context — it’s infrastructure pricing for compute that runs beyond human attention spans.

    The session-hour model also signals something about Anthropic’s infrastructure cost structure. They’re pricing on active execution time because that’s what actually taxes their systems. Idle sessions don’t cost them much; active agents do. The billing model follows the actual resource consumption pattern.

    Frequently Asked Questions

    Is the $0.08/session-hour charge in addition to token costs, or does it replace them?

    In addition to. You pay both: standard token rates for all input and output tokens, plus $0.08 per hour of active session runtime. They’re separate line items.

    Does prompt caching work in Managed Agents sessions?

    Yes. Prompt caching multipliers apply identically to Managed Agents sessions as they do to standard API calls. If your agent has a large, stable system prompt, caching it can significantly reduce input token costs.

    What happens if my session crashes? Am I billed for the crashed time?

    Runtime accrues only while status is running. Terminated sessions stop accruing. Anthropic’s infrastructure handles checkpointing and crash recovery — the session state is preserved even if the session terminates unexpectedly.

    Can I use Managed Agents on the free API tier?

    Managed Agents is available to all Anthropic API accounts in public beta, but standard tier access and rate limits apply. Free API tier users receive a small credit for testing.

    How does this compare to running agents on my own infrastructure?

    See our full breakdown: Build vs. Buy: The Real Infrastructure Cost of Claude Managed Agents. Short version: the $0.08/hour is almost certainly cheaper than provisioning and maintaining equivalent compute, but you trade control and data locality for that simplicity.

    Are there volume discounts?

    Volume discounts are available for high-volume users but negotiated case-by-case. Contact Anthropic enterprise sales.

    Does web search billing count against the $10/1,000 rate if the search returns no results?

    Anthropic’s current docs don’t explicitly address failed searches. Treat any triggered search as billable until confirmed otherwise.

    For the full session-hour math worked out by workload type, see: Claude Managed Agents Pricing, Decoded: What a Session-Hour Actually Costs You. For the build-vs-buy infrastructure comparison: Build vs. Buy: The Real Infrastructure Cost. For enterprise deployment patterns: Rakuten Stood Up 5 Enterprise Agents in a Week.

  • Does Homeowners Insurance Cover Radon Mitigation? (2026)

    Does Homeowners Insurance Cover Radon Mitigation? (2026)

    The Distillery
    — Brew № 1 · Radon Mitigation
    Standard homeowners insurance policies do not cover radon mitigation. State Farm, Allstate, USAA, Liberty Mutual, and every other major carrier exclude it because radon is classified as a gradual environmental condition rather than a sudden event. However, alternative paths exist to reduce the cost, including state assistance programs, HSA and FSA eligibility with medical documentation, real estate transaction negotiation, and contractor financing.

    The short answer is no. Homeowners insurance does not cover radon mitigation. Not State Farm, not Allstate, not USAA, not Liberty Mutual, not Progressive, not Farmers. Not any of the major carriers and not any of the minor ones. Standard homeowners insurance policies in 2026 exclude radon mitigation as a category of expense, and they have for decades.

    But “no” isn’t actually the complete answer, because there are a handful of narrow situations where insurance can partially offset radon-related costs, and there are several alternative paths to reducing the financial burden that people routinely overlook. This is the honest breakdown: why insurance won’t cover the main cost, what exceptions might apply to you, and what realistic options exist instead.

    Why homeowners insurance doesn’t cover radon mitigation

    The reason is structural to how homeowners insurance is designed, not arbitrary. Standard policies cover losses from sudden and accidental events — fires, storms, theft, vandalism, covered water damage, liability claims when someone is injured on your property. They explicitly exclude losses from gradual conditions that develop over time — foundation settling, wear and tear, mold from chronic moisture, soil movement, and yes, radon accumulation.

    Radon sits firmly in the “gradual condition” category. Uranium has been decaying in the soil beneath your home for billions of years. Radon has been seeping up toward your foundation for the entire time the home has existed. It isn’t an event, it’s a steady-state condition. Insurance companies classify it the same way they classify foundation settling, soil subsidence, and long-term moisture damage — as a maintenance issue the homeowner is responsible for addressing.

    Every major insurance carrier’s position on radon, as of 2026:
    – State Farm: excluded from standard policies
    – Allstate: excluded from standard policies
    – USAA: excluded from standard policies
    – Liberty Mutual: excluded from standard policies
    – Progressive: excluded from standard policies
    – Farmers: excluded from standard policies
    – Nationwide: excluded from standard policies
    – Travelers: excluded from standard policies

    Some of these carriers offer add-on endorsements or riders for environmental hazards that might include limited radon coverage — typically for $25 to $100 per year in additional premium — but the coverage is usually capped at low amounts (often $500 to $1,500) and requires specific triggering events. None of them cover routine radon mitigation as a standard inclusion.

    The exclusion isn’t hidden in the fine print; it’s a standard feature of how homeowners insurance works across the industry. Radon is not insurable under conventional policies for the same reason chronic roof wear isn’t insurable — it’s a foreseeable ongoing condition, not an unexpected loss.

    The narrow exceptions where insurance might help

    There are a few specific situations where homeowners insurance can partially cover radon-adjacent costs. None of them cover routine mitigation, but they’re worth understanding because they occasionally apply.

    1. Storm damage to an existing mitigation system

    If a severe storm damages the exterior portion of your radon mitigation system — for example, high winds rip the vent pipe off the exterior wall, or hail damages the rooftop vent flashing — your homeowners insurance may cover the repair cost as storm damage. The key is that the damage was caused by a covered peril (the storm), not by the radon itself. The radon system is treated as part of the home’s physical infrastructure for the purpose of storm damage claims.

    What this covers: Physical repair or replacement of damaged mitigation system components after a covered weather event.

    What this does not cover: Any reduction in system effectiveness, any increase in indoor radon levels during the repair period, or the original installation cost.

    Realistic claim value: $300 to $1,200 for typical storm damage to a mitigation system.

    2. Covered water damage from a failed sump integration

    If your mitigation system includes sump pit integration and a component failure causes the sump pump to malfunction, resulting in basement flooding, your homeowners insurance may cover the water damage itself — even though the radon system repair is not covered. The covered peril is the water damage, not the radon system.

    What this covers: Water extraction, drying, damaged flooring and drywall replacement, damaged contents.

    What this does not cover: Repair of the sump pump, the mitigation system, or any ongoing radon-related costs.

    This is a fairly rare scenario because sump integration in well-installed mitigation systems rarely causes pump failures, but it’s worth knowing the distinction.

    3. Liability coverage in disclosure-related lawsuits

    If you sell a home, the buyer later discovers elevated radon levels, and the buyer can prove you knew about the problem and failed to disclose it, your homeowners insurance liability coverage might apply to any resulting lawsuit. Whether coverage applies depends on your policy language and your state’s disclosure laws.

    This is a complex legal scenario and not a reliable safety net. Most states require disclosure of known material defects including radon, and most disclosure-related lawsuits are settled outside of insurance coverage because they involve allegations of intentional concealment rather than accidents.

    Realistic use case: Rare. Consult a real estate attorney if this situation applies to you.

    4. Future health claims linked to radon exposure

    Homeowners insurance does not cover medical claims for illness allegedly caused by radon exposure. Health insurance might, if a doctor diagnoses a condition and documents the causal link to radon, but this is uncommon and highly fact-specific. Most radon-related lung cancer cases are not pursued as insurance claims because the latency period (typically 5 to 25 years between exposure and cancer diagnosis) makes causation difficult to establish definitively.

    This category is effectively a non-option for most homeowners.

    What homeowners insurance actually does when radon is detected

    In most cases, the interaction between a homeowner and their insurance company around radon is limited to the following:

    1. Nothing. The homeowner discovers elevated radon, pays for mitigation out of pocket, and never contacts the insurance company. This is the most common outcome.
    2. A disclosure question at renewal. Some insurance companies ask about known environmental conditions at policy renewal. Disclosing that you had elevated radon and mitigated it is honest and typically does not affect your rate — mitigation is viewed as responsible maintenance.
    3. A denied claim. If a homeowner attempts to file a radon mitigation claim anyway, it will be denied citing the policy exclusion for gradual environmental conditions.

    There is no meaningful benefit to involving your insurance company in routine radon mitigation. The outcome of the call is almost always a polite “that’s not covered.”

    Alternative paths to reducing the cost

    Insurance isn’t the answer, but there are several legitimate ways to reduce or offset the cost of radon mitigation that most homeowners don’t know about.

    1. State-level grants and assistance programs

    Several states offer grants, loans, or financial assistance for radon mitigation to qualifying homeowners. Program details and eligibility change year to year, and availability is usually limited to specific income brackets or high-risk geographic areas, but real money is available in the right situations.

    States with active radon mitigation assistance programs (as of 2026):
    Pennsylvania Department of Environmental Protection: limited grants for low-income homeowners in high-radon counties
    Illinois Emergency Management Agency: Illinois Radon Mitigation Program for qualifying households
    Iowa Department of Public Health: Iowa Radon Program mitigation assistance
    Minnesota Department of Health: financial assistance programs through the state radon office
    Colorado Department of Public Health and Environment: grants in some counties through the state radon program
    Wisconsin Department of Health Services: limited assistance through regional radon information centers

    Grant amounts typically range from $500 to $1,500 per qualifying household when awarded. Applications usually require income verification, proof of an elevated radon test, and a quote from a certified mitigator.

    How to check if your state has a program:
    – Contact your state health department’s radon section
    – Search for “[your state] radon mitigation grant”
    – Check the EPA’s state radon contacts page at epa.gov/radon/find-your-states-radon-contact-information

    2. HSA and FSA eligibility

    Radon mitigation can sometimes qualify as a medical expense for Health Savings Account (HSA) or Flexible Spending Account (FSA) purposes when a physician has documented a health condition affected by radon exposure. This is most commonly applicable when a household member has been diagnosed with lung cancer, chronic respiratory disease, or another condition where continued radon exposure is medically contraindicated.

    How HSA/FSA eligibility works for radon mitigation:

    When eligible, the mitigation cost can be paid with pre-tax HSA or FSA dollars, effectively reducing the cost by the user’s marginal tax rate. For a household in the 22% federal tax bracket plus a 5% state tax, a $2,000 mitigation paid with HSA dollars has an effective cost of roughly $1,460 — a savings of about $540.

    Requirements:
    – A licensed physician’s letter documenting the medical necessity of radon mitigation for a specific diagnosis
    – The mitigation must be installed in a primary residence (not a rental property)
    – The expense must be documented according to IRS Publication 502 guidelines
    – A Letter of Medical Necessity (LMN) is required for FSA reimbursement

    This is not a routine use of HSA/FSA funds. Most radon mitigations do not qualify because no medical diagnosis is driving the work. Consult a tax professional before relying on this approach, and keep all documentation for at least seven years in case of audit.

    3. Federal and state tax benefits

    Direct tax deductions for radon mitigation are uncommon for owner-occupied homes but possible in a few specific scenarios:

    Rental property owners: If you install radon mitigation on a rental property you own, the cost can typically be deducted as either a repair (deducted fully in the year incurred) or a capital improvement (depreciated over the property’s useful life). Classification depends on the specific circumstances. Consult a tax professional.

    Medical expense deduction: As described under HSA/FSA above, radon mitigation can occasionally qualify as a deductible medical expense when a physician documents medical necessity. The deduction only applies to the portion of total medical expenses exceeding 7.5% of adjusted gross income, which is a high threshold for most taxpayers.

    State-level credits: A few states have offered limited tax credits for residential radon mitigation at various times. Check with your state department of revenue for current availability.

    Energy efficiency credits: Radon mitigation does not qualify for the federal energy efficiency tax credits that cover HVAC, insulation, and similar improvements. Those credits are specifically for energy-saving measures.

    Tax rules change frequently. Consult a qualified tax professional before claiming any deduction related to radon mitigation.

    4. Home warranty add-on coverage

    Some home warranty companies offer optional coverage for radon fan replacement as an add-on to their standard plans. This does not cover the initial installation, but it can cover the cost of replacing a failed fan motor years after installation — typically a $300 to $600 expense that would otherwise come out of pocket.

    How home warranty radon coverage typically works:
    – Monthly premium increase of $5 to $15 for the radon add-on
    – Coverage triggers when the fan fails and requires replacement
    – Service fee of $75 to $125 per claim
    – Limits vary; typical cap is $500 to $1,000 per claim

    For homeowners with aging mitigation systems who expect fan replacement within a few years, the math can work out favorably. For homeowners with new systems still under manufacturer warranty, it’s usually unnecessary.

    5. Real estate transaction negotiation

    For homeowners buying a new home where a pre-purchase radon test comes back elevated, the most effective “cost savings” is often getting the seller to pay for mitigation as part of the sale. Depending on market conditions and negotiating leverage, sellers pay for mitigation in roughly 40 to 60 percent of cases where it becomes a contract contingency.

    Typical outcomes:
    Buyer’s market: Seller pays 70-100% of mitigation cost as a concession to close the deal
    Balanced market: Cost is often split 50/50 or the seller pays in full
    Seller’s market: Buyer often pays in full to keep the deal competitive, though sometimes splits the cost

    Sellers in high-radon states increasingly install mitigation systems proactively before listing to avoid the contingency negotiation altogether. A documented working mitigation system has become a mild selling point in regions where radon awareness is high.

    Standard contract language: Most real estate purchase contracts include a radon testing contingency that allows the buyer to request mitigation or walk away if levels exceed the EPA action level of 4.0 pCi/L. If your contract includes this contingency and your test comes back elevated, the negotiation path is well-established and usually results in some level of seller contribution.

    6. Manufacturer rebates and contractor financing

    Some radon mitigation contractors offer financing plans that spread the installation cost over 12 to 60 months, typically with low or zero interest for qualified buyers. This doesn’t reduce the total cost but makes it easier to absorb.

    Manufacturer rebates on radon fans are rare but occasionally appear — primarily from RadonAway on specific fan models during promotional periods. Savings when available are usually $25 to $100.

    Payment plan options to ask about:
    – In-house contractor financing (0% interest for 6-12 months is common)
    – Third-party home improvement financing through companies like Synchrony or Wells Fargo
    – Home equity line of credit (HELOC) for larger installations
    – Credit card payment with 0% introductory APR offers

    These don’t reduce the cost but can make it manageable for homeowners who can’t cover the full $1,500 to $2,500 installation in a single payment.

    What to do if you can’t afford mitigation

    If you’ve confirmed elevated radon levels and can’t afford the mitigation cost in the near term, several interim steps can reduce your exposure while you work out the financing.

    Short-term harm reduction:

    1. Increase ventilation in the lower level of the home. Opening windows and running ventilation fans temporarily reduces indoor radon concentrations. This is not a long-term solution and doesn’t work in cold climates where windows need to stay closed, but it can meaningfully lower exposure as a stopgap.

    2. Avoid spending time in the lowest level of the home. Radon concentrations are typically highest in basements and the ground floor. Reducing time spent in those areas proportionally reduces exposure. If your basement is where family members spend most of their waking hours, moving that activity to upper levels temporarily reduces risk.

    3. Seal obvious foundation cracks. Sealing cracks alone is not effective mitigation, per EPA and AARST, but it can marginally reduce radon entry as an interim measure while you save for a professional system.

    4. Run bathroom and kitchen exhaust fans more frequently. These fans create negative pressure in the home that actually increases radon entry rates in some cases, but when combined with open windows on upper floors they can create an air exchange pattern that dilutes indoor radon. Use with caution.

    Longer-term planning:

    • Check state grant programs and apply if eligible
    • Contact your state radon office to ask about low-income assistance
    • Discuss the installation with certified mitigators and ask about payment plans
    • Compare 2-3 quotes to find the lowest legitimate price for your specific home
    • Consider DIY passive approaches (floor sealing, increased ventilation) as temporary measures while saving

    What not to do:

    • Don’t attempt a DIY active radon mitigation system unless you have specific training. An incorrectly installed ASD system can create problems larger than the original radon issue, including fan-induced negative pressure that worsens radon entry in other parts of the home. EPA explicitly discourages DIY installation for this reason.
    • Don’t ignore the test result. Elevated radon levels are a cumulative health risk, and the cost of a professional mitigation system is a small fraction of the cost of lung cancer treatment.
    • Don’t use DIY test kits you don’t trust as a reason to conclude your home is fine. If you tested elevated once, retest before concluding anything, but don’t discount a confirmed elevated result.

    The bottom line on insurance

    Homeowners insurance does not cover radon mitigation, will not cover radon mitigation, and has never covered radon mitigation under standard policies. The exclusion is structural and industry-wide, not a gap you can negotiate around with your specific carrier.

    But the complete picture includes alternative paths that most homeowners don’t know exist: state grants, HSA/FSA eligibility with medical documentation, real estate transaction negotiation, home warranty add-ons, and contractor financing. These options don’t eliminate the cost but they can meaningfully reduce it or make it manageable for households that would otherwise struggle with a $1,500 to $2,500 out-of-pocket expense.

    The conversation that matters isn’t with your insurance company. It’s with certified mitigators about the actual installation, with your state radon program about assistance availability, with your tax professional about possible deductions, and — if you’re in a real estate transaction — with your agent about negotiating seller contribution. Those conversations produce results. The insurance call does not.

    Frequently asked questions

    Does any homeowners insurance cover radon mitigation?

    No standard homeowners insurance policy from any major carrier covers routine radon mitigation. The exclusion is structural — radon is classified as a gradual environmental condition rather than a sudden event — and applies across the industry. Some carriers offer environmental hazard riders that may provide limited coverage for radon-related costs, but these are capped at low amounts and do not cover typical mitigation installation. Routine mitigation is an out-of-pocket expense for homeowners in virtually every case.

    Will my insurance cover storm damage to my radon mitigation system?

    Yes, if the damage is caused by a covered peril like high winds, hail, or falling trees. The key is that the damage must come from an event your policy covers, not from the radon itself or from system wear. If a storm rips the exterior vent pipe off your home, the repair is typically covered as standard storm damage. The original installation cost and any ongoing radon-related costs remain the homeowner’s responsibility.

    Can I use my HSA to pay for radon mitigation?

    Only if a licensed physician documents the mitigation as medically necessary for a specific diagnosis affecting a household member. Most radon mitigations do not qualify because no medical condition is driving the work. When HSA or FSA payment is eligible, the effective cost is reduced by the homeowner’s marginal tax rate, which typically produces savings of $300 to $600 on a $2,000 mitigation. Consult a tax professional and keep medical documentation on file before relying on this approach.

    Is radon mitigation tax deductible?

    For primary residences, radon mitigation is generally not tax deductible unless it qualifies as a medical expense (requiring physician documentation and a diagnosis). For rental properties, the cost can typically be deducted as a repair or depreciated as a capital improvement, depending on how it’s classified. A few states have offered limited tax credits for residential radon mitigation in the past — check with your state department of revenue for current programs.

    What state has the best radon mitigation assistance program?

    Pennsylvania, Illinois, Iowa, and Minnesota have the most active state-level assistance programs as of 2026, typically offering grants of $500 to $1,500 for qualifying low-income households in high-radon areas. Program availability and funding change year to year. Contact your state health department’s radon section directly for current eligibility requirements and application procedures.

    If I’m buying a home, who should pay for radon mitigation?

    It depends on the market and the specific contract, but negotiation is normal. In buyer’s markets, sellers typically pay for 70-100% of mitigation cost as a contingency concession. In balanced markets, the cost is often split or paid entirely by the seller as a goodwill gesture. In seller’s markets, buyers more frequently pay to keep the deal together. Most purchase contracts include a radon testing contingency that establishes the negotiation framework. Work with your real estate agent to craft a contingency that protects your interests based on current market conditions.


    THE TYGART MEDIA DISTILLERY
    This is a knowledge node.
    Part of the Radon Mitigation knowledge base — a category being brewed openly, one node at a time. Every article passes through an eight-pass distillation pipeline before publication. Live organic value tracked publicly on the Distillery Live Value Meter.


  • RCP Proxy Estimation Guide: How to Calculate When Primary Data Is Missing

    RCP Proxy Estimation Guide: How to Calculate When Primary Data Is Missing

    The Agency Playbook
    TYGART MEDIA · PRACTITIONER SERIES
    Will Tygart
    · Senior Advisory
    · Operator-grade intelligence

    The RCP requires 12 data points per job. In practice, some of those data points will be unavailable — particularly for historical jobs being calculated retrospectively, or for field situations where documentation wasn’t captured as completely as the standard requires. The proxy estimation methodology provides documented substitution methods that produce defensible, auditor-acceptable estimates when primary data is missing.

    Key principle: A documented estimate with a stated assumption is always preferable to a blank field in an RCP report. ESG auditors understand that emissions calculation involves uncertainty — what they require is transparency about where estimation was used and what the basis of that estimation was. Undocumented guesses are not acceptable. Documented proxies are.

    Data Quality Tiers

    Seven cards naming common AI chatbot failure modes
    RCP proxy estimation — data quality tiers.

    The RCP uses three data quality tiers, consistent with GHG Protocol Scope 3 guidance:

    Tier Description Audit Acceptability
    Tier 1 — Primary measured data Actual measurements from job records: GPS mileage, disposal facility receipts with weights, materials purchase orders by job Highest — preferred for all data points
    Tier 2 — Primary estimated data Calculated from documented job parameters using RCP proxy methods: affected area × consumption rate, crew size × duration × unit rate Acceptable — must document calculation method and basis
    Tier 3 — Spend-based / invoice-based proxy Dollar amount × industry average emission factor — the fallback of last resort Lowest — use only when no job-specific data is available; flag prominently in data quality notes

    Proxy Methods by Data Point

    Three cards for field SOPs, owner prompts, and KPI rhythm in an operations kit
    Proxy methods by data point.

    Data Point 1 — Vehicle Mileage (Transportation)

    Primary source: GPS fleet tracking data, dispatch records, driver logs.

    Proxy method: Use Google Maps or equivalent mapping tool to calculate round-trip distance from your facility (or prior job address for multi-stop days) to the job site. Multiply by the number of crew trips documented in time records or invoices. This is a Tier 2 estimate.

    Default proxy (Tier 3, last resort): Industry average mobilization distance for restoration contractors is 22 miles one-way (44 miles round trip). Apply this default only when no address or routing information is available. Note as Tier 3 estimate in data quality section.

    Data Point 2 — Waste Transport Mileage

    Primary source: Waste manifests and hauler receipts (these typically include origin and destination).

    Proxy method: Use the distance from the job site to the nearest licensed disposal facility of the appropriate type (standard C&D landfill, licensed ACM facility, medical waste facility). Use online waste facility directories (EPA RCRA Info for hazmat, state environmental agency databases for C&D landfills) to identify the nearest appropriate facility.

    Default proxies by facility type (Tier 3): Standard C&D landfill: 18 miles. Licensed ACM facility: 60 miles. Licensed PCB incineration: 150 miles. Medical waste facility: 55 miles.

    Data Point 3 — Equipment Power Source

    Primary source: Job documentation noting whether equipment ran on building power or contractor generator; generator fuel logs.

    Proxy method: Default assumption is building electrical supply unless your company policy or the job type (remote location, building power unavailable) indicates otherwise. Note the assumption explicitly. If generator use is suspected but not documented, use the following generator fuel proxy: standard drying equipment setup (3 dehumidifiers + 6 air movers) consuming approximately 2.5 gallons of diesel per 8-hour shift × number of drying days × 10.21 kg CO2e per gallon diesel.

    Data Points 4–5 — Chemical Treatments and PPE Consumption

    Application rate proxies by job type and surface type:

    Job Type / Surface Antimicrobial Rate Tyvek Suits per Tech per Day Glove Pairs per Tech per Day N95/P100 per Tech per Day
    Cat 1 water — porous surfaces 0.008 L/sq ft 0.5 2 0.5
    Cat 2 water — porous surfaces 0.015 L/sq ft 1.0 3 1.0
    Cat 3 water — porous surfaces 0.025 L/sq ft (×2 applications) 2.0 5 2.0
    Mold Condition 3 — first application 0.020 L/sq ft 2.0 4 1.5
    Mold Condition 3 — second application 0.015 L/sq ft 2.0 4 1.5
    Fire — smoke cleaning (chemical sponge + cleaner) 1 sponge per 50 sq ft + 0.010 L/sq ft cleaner 1.5 4 1.5
    Hazmat abatement (Level C, standard exit protocol) N/A (wetting agent: 0.003 L/sq ft ACM) 3.0 (full replacement each exit) 6 2 pairs OV/P100
    Biohazard Level C 0.025 L/sq ft × 2 applications 3.0 (full replacement each exit) 6 2 pairs OV/P100
    Biohazard Level B (decomposition) 0.025 L/sq ft × 2 applications 3.0 Level B full-suit (replace each exit) 6 Supplied air — 0 disposable

    Data Point 6 — Containment Materials

    Proxy method: Standard containment for a single affected room (standard ceiling height 8–10 ft): perimeter of affected area (linear feet) × ceiling height × 1.2 (overlap factor) = m² of poly sheeting. For compartmentalized commercial spaces, add 20 m² per additional doorway or penetration point.

    Zipper doors: 1 per entry/exit point, typically 2 per contained area (entry + equipment pass-through).

    Data Points 7–8 — Waste Volume and Disposal

    Volume proxy: Use weight estimation proxies from the RCP Emission Factor Reference Table (drywall at 2.5 lbs/sq ft, carpet at 3.0 lbs/sq ft, etc.) applied to the demolished area documented in job scope records.

    Disposal method proxy: If disposal facility type is unknown, apply default based on material type: standard C&D for non-contaminated demolition debris, regulated C&D or hazmat for contaminated materials (see Table 3 in the Emission Factor Reference).

    Data Points 9–10 — Demolished and Installed Materials

    Proxy method: Calculate from demolition scope records (affected area by room, material type documented in scope of work or Xactimate/Symbility estimate). Weight estimation proxies apply as above. For installed materials in reconstruction phase, use square footage from scope-of-work documentation and apply standard weight proxies.

    Documenting Proxy Use in Your RCP Report

    Three panels showing one problem, three options, one recommendation
    Documenting proxy use in your RCP report.

    Every proxy estimate must be documented in the data quality section of the per-job carbon report. The format for documenting a proxy is: [Data point name]: [Tier 2 or 3 estimate]. [Brief description of proxy method]. [Source of proxy rate or assumption].

    Example: “Vehicle mileage: Tier 2 estimate. Round-trip distance calculated using Google Maps from company facility to job site address (44 miles RT × 4 crew trips). Crew trip count from job invoices. Source: RCP proxy method P-4-1.”

    Example: “PPE consumption: Tier 2 estimate. Cat 3 water damage standard consumption rate applied (2.0 Tyvek/tech/day, 5 glove pairs/tech/day) per RCP Table A-5. Actual PPE not tracked separately on this job.”

    Can a per-job carbon report with all Tier 2 estimates be used in GRESB reporting?

    Yes. GRESB accepts primary data at various quality levels, including documented estimates. A Tier 2 estimate is primary data (not spend-based estimation) and is acceptable. The data quality notation in the RCP report demonstrates that you have applied documented methodology rather than guessing, which is what auditors need to see.

    What is the margin of error typical for Tier 2 proxy estimates?

    Typical uncertainty range for Tier 2 RCP estimates is ±20–35% relative to primary measured data. This compares favorably to spend-based estimation (Tier 3), which typically has ±50–100% uncertainty for restoration work due to the high variability of job type, scope, and emission profile at equivalent invoice amounts.

    Should you disclose the uncertainty range in the per-job carbon report?

    The RCP does not require quantified uncertainty ranges in the per-job report, but noting that Tier 2 estimates were used in the data quality section effectively communicates to auditors that the figure carries inherent estimation uncertainty. For clients whose ESG consultants or auditors specifically request uncertainty ranges, use the guidance values above (±20–35% for Tier 2).


  • RCP Emission Factor Reference Table: All Values in One Place

    RCP Emission Factor Reference Table: All Values in One Place

    The Agency Playbook
    TYGART MEDIA · PRACTITIONER SERIES
    Will Tygart
    · Senior Advisory
    · Operator-grade intelligence

    This reference table consolidates all emission factors used in Restoration Carbon Protocol calculations. It is the lookup document you use when completing a per-job carbon report — every factor needed for Categories 1, 4, 5, and 12 across all five job types is in this table, with source citations for audit purposes.

    Version: RCP v1.0 | Factor vintage: EPA 2024, DEFRA 2024, EPA WARM v16 | Units: All values in kg CO2e unless noted as tCO2e

    Table 1: Category 4 — Vehicle Transportation

    Seven cards naming common AI chatbot failure modes
    Category 4 vehicle transportation emission factors.
    Vehicle Type Fuel kg CO2e per mile Source
    Passenger car Gasoline 0.355 EPA Table 2, Mobile Combustion 2024
    Light-duty truck / work van (under 8,500 lbs GVWR) Gasoline 0.503 EPA Table 2, Mobile Combustion 2024
    Light-duty truck / cargo van Diesel 0.523 EPA Table 2, Mobile Combustion 2024
    Medium-duty truck / equipment trailer (8,500–26,000 lbs GVWR) Diesel 1.084 EPA Table 2, Mobile Combustion 2024
    Heavy-duty truck — unloaded (26,000+ lbs GVWR) Diesel 1.612 EPA Table 2, Mobile Combustion 2024
    Heavy-duty truck — loaded (waste hauling, C&D) Diesel 2.25 EPA Table 2 + load factor adjustment
    Licensed hazmat waste hauler (ACM, lead, general hazmat) Diesel 3.20 EPA Table 2 + hazmat vehicle premium
    Licensed hazmat hauler (PCB, high-hazard specialty) Diesel 3.80 EPA Table 2 + specialty vehicle premium
    Medical waste hauler (biohazard) Diesel 2.80 EPA Table 2 + medical waste vehicle
    Pack-out truck (contents restoration) — loaded Diesel 2.25 EPA Table 2 + load factor
    Pack-out truck — empty (return trip) Diesel 1.612 EPA Table 2 — unloaded heavy

    Table 2: Category 1 — Materials

    Three cards for field SOPs, owner prompts, and KPI rhythm in an operations kit
    Category 1 materials emission factors.

    Chemical Treatments

    Material Unit kg CO2e per unit Source
    Quaternary ammonium antimicrobial / biocide (liquid) Liter 2.8 EPA EEIO — Chemical manufacturing sector
    Hydrogen peroxide-based antimicrobial/biocide Liter 1.9 EPA EEIO — Chemical manufacturing sector
    Borax-based mold treatment kg 1.1 EPA EEIO — Inorganic chemical manufacturing
    Hospital-grade disinfectant (EPA-registered) Liter 2.8 EPA EEIO — Chemical manufacturing sector
    Enzyme biological digester / deodorizer Liter 1.6 EPA EEIO — Specialty chemical manufacturing
    Encapsulant / smoke-blocking primer Gallon 4.2 EPA EEIO — Paint and coatings manufacturing
    Thermal fogging agent Liter 2.1 EPA EEIO — Chemical manufacturing sector
    Desiccant drying agent (silica gel) kg 1.4 EPA EEIO — Chemical manufacturing sector
    Wetting agent / amended water (surfactant for ACM) Liter 1.4 EPA EEIO — Chemical manufacturing sector
    Dry ice (CO2 pellets for blast cleaning) kg 0.85 EPA EEIO — Industrial gas manufacturing

    Personal Protective Equipment

    PPE Item Unit kg CO2e per unit Source
    Disposable Tyvek suit (Level C) Each 1.2 EPA EEIO — Apparel manufacturing
    Level B full encapsulating suit Each 3.0 EPA EEIO — Apparel/specialty manufacturing
    Level C PPE full kit (Tyvek + gloves + goggles + boot covers) Kit 1.8 Composite of individual items
    Level B PPE full kit (encapsulating suit + supplied air + gloves) Kit 4.2 Composite of individual items
    Nitrile gloves (pair) Pair 0.3 EPA EEIO — Rubber and plastics manufacturing
    N95 respirator (disposable) Each 0.4 EPA EEIO — Medical equipment manufacturing
    Half-face respirator, P100 cartridges (pair) Pair 0.8 EPA EEIO — Medical equipment manufacturing
    Full-face respirator cartridges (pair) Pair 1.2 EPA EEIO — Medical equipment manufacturing
    Boot covers (pair) Pair 0.15 EPA EEIO — Rubber and plastics

    Containment and Filtration

    Material Unit kg CO2e per unit Source
    6-mil polyethylene sheeting 0.55 EPA EEIO — Plastics product manufacturing
    4-mil polyethylene sheeting 0.37 EPA EEIO — Plastics product manufacturing
    Double-layer 6-mil containment (hazmat/biohazard) 1.10 2× single-layer factor
    Zipper door — disposable Each 1.8 EPA EEIO — Plastics/hardware
    Zipper door — reusable (amortized over 20 uses) Use 0.09 1.8 ÷ 20 uses
    HEPA filter — air scrubber (standard) Each 3.2 EPA EEIO — Industrial machinery manufacturing
    HEPA vacuum bag (commercial grade) Each 0.4 EPA EEIO — Paper/plastics manufacturing
    Biohazard bag — 33-gallon red (medical waste) Each 0.65 EPA EEIO — Medical plastics manufacturing
    ACM disposal bag — 6-mil labeled (33-gallon) Each 0.55 EPA EEIO — Plastics product manufacturing
    Sharps disposal container (1-gallon) Each 0.35 EPA EEIO — Plastics/medical equipment
    Glove bag (pipe insulation removal) Each 0.85 EPA EEIO — Plastics product manufacturing

    Table 3: Category 5 — Waste Disposal

    Waste Type Disposal Method tCO2e per ton Source
    Standard C&D debris (non-hazardous mixed) Landfill 0.16 EPA WARM v16
    Cat 2 water-contaminated porous materials Standard landfill 0.18 EPA WARM + contamination premium
    Cat 3 sewage-contaminated materials Regulated C&D landfill 0.22 EPA WARM + regulated disposal
    Smoke-contaminated C&D debris (standard) Standard landfill 0.16 EPA WARM v16
    Smoke-contaminated C&D (regulated facility) Licensed C&D landfill 0.20 EPA WARM + transport premium
    Mold-contaminated porous materials Standard landfill (most jurisdictions) 0.18 EPA WARM + contamination premium
    Friable ACM (pipe insulation, spray fireproofing) Licensed hazmat landfill 0.42 EPA WARM + licensed facility + transport
    Non-friable ACM (floor tiles, roofing, joint compound) Licensed C&D with ACM cell 0.28 EPA WARM + regulated C&D transport
    Lead paint debris (TCLP-classified hazardous) Licensed hazmat landfill 0.38 EPA WARM + hazmat transport
    PCB-containing materials ≥50 ppm Licensed PCB incineration 1.85 EPA hazardous waste incineration factors
    PCB-containing materials <50 ppm Licensed landfill 0.22 EPA WARM + transport premium
    Mercury-containing lamps/thermostats Mercury recycler 0.15 EPA WARM — recycling credit offset
    Regulated medical/biohazard waste (standard) Autoclave + licensed landfill 0.55 EPA medical waste treatment factors
    High-pathogen biohazard waste High-temperature incineration 0.85 EPA hazardous waste incineration factors
    Sharps waste Sharps autoclave or incineration 0.65 EPA medical waste — sharps category
    Contaminated water (Cat 3, to wastewater treatment) Municipal wastewater treatment 0.000272 per liter EPA WARM v16 — wastewater treatment
    Disposable PPE — standard Standard landfill 0.25 EPA WARM — mixed plastics
    Disposable PPE — hazmat-contaminated Licensed hazmat or medical waste landfill 0.30–0.55 Apply appropriate hazmat or medical waste factor

    Table 4: Category 12 — Demolished Building Materials

    Material tCO2e per ton (landfill) tCO2e per ton (recycled) Source
    Gypsum drywall (1/2″) 0.16 0.02 EPA WARM v16
    Dimensional lumber / wood framing -0.07 -0.15 EPA WARM v16 — carbon storage credit
    OSB sheathing -0.05 -0.12 EPA WARM v16 — carbon storage credit
    Carpet + pad (standard residential/commercial) 0.33 0.05 EPA WARM v16
    Hardwood flooring -0.12 -0.18 EPA WARM v16 — carbon storage credit
    Vinyl / LVP flooring 0.28 0.08 EPA WARM v16 — plastics category
    Ceramic / porcelain tile 0.04 0.01 EPA WARM v16 — inert material
    Fiberglass batt insulation 0.33 0.05 EPA WARM v16
    Cellulose insulation (spray or loose-fill) 0.06 -0.02 EPA WARM v16
    Spray polyurethane foam insulation (SPF) 0.72 N/A EPA WARM v16 — plastics category
    Acoustic ceiling tiles (standard) 0.12 0.03 EPA WARM v16 — ceiling tile category
    Structural steel (demolished) -0.85 -0.95 EPA WARM v16 — steel recycling credit
    Copper pipe / wiring -0.45 -0.60 EPA WARM v16 — copper recycling credit
    Aluminum (ductwork, framing) -1.20 -1.45 EPA WARM v16 — aluminum recycling credit (high value)

    Weight Estimation Proxies

    Three panels showing one problem, three options, one recommendation
    Weight estimation proxies for RCP inventories.

    When disposal receipts are not available, use these weight proxies to estimate demolished material tonnage:

    Material Weight per sq ft (installed, dry) Notes
    1/2″ gypsum drywall 2.5 lbs Use dry weight, not post-water-damage wet weight
    5/8″ gypsum drywall (Type X) 3.1 lbs Common in commercial construction
    Carpet + pad (residential) 3.0 lbs Including pad and tack strips
    Carpet + pad (commercial, glue-down) 2.2 lbs Heavier carpet, no pad
    LVP / vinyl plank flooring 2.8 lbs Including underlayment
    Ceramic tile (floor, 3/8″) 4.5 lbs Including thin-set mortar
    Acoustic ceiling tiles (2’×2′ standard) 1.8 lbs Mineral fiber type
    Fiberglass batt insulation (3.5″ R-13) 0.5 lbs Per sq ft of coverage area
    Dimensional lumber 2×4 wall framing (per linear foot of wall) 4.0 lbs Assumes 16″ OC framing in 8-ft walls
    Non-friable ACM floor tile (9″×9″) 4.0 lbs Including mastic adhesive

    How often will this reference table be updated?

    The RCP emission factor reference table will be updated annually following the release of updated EPA WARM, EPA Mobile Combustion, and DEFRA databases. Version numbers are included in the table header — always cite the version used in your per-job carbon report data quality notes.

    What if I need an emission factor for a material not in this table?

    First check EPA WARM v16 directly (available free at epa.gov/warm). Second, check the EPA EEIO database for the relevant industry sector. Third, check DEFRA’s Conversion Factors for Company Reporting. If none of these sources contain the specific material, use the closest proxy category and document the substitution in your data quality notes.

    Are these factors suitable for use in EU CSRD reporting?

    EPA and EPA WARM factors are US-specific but are accepted in most international ESG frameworks when accompanied by clear source citation. For EU CSRD reporting specifically, DEFRA factors (UK) or OECD emission factors may be preferred by auditors for non-US operations. The RCP will publish a DEFRA-specific factor table in a future supplement for EU-applicable reporting contexts.


    Table 6: Refrigerant GWP Values — IPCC AR6 Update

    The Global Warming Potential values for refrigerants used in restoration drying equipment have been updated under IPCC Sixth Assessment Report (AR6, 2021). AR6 GWP-100 values are 14–18% higher than AR5 for the HFCs commonly found in LGR dehumidifiers. RCP v1.0 uses AR6 values for refrigerant-related calculations. The EPA AIM Act continues to use AR4 values for regulatory compliance; UNFCCC/Paris reporting uses AR5. When delivering data to clients, disclose which GWP vintage was used.

    Refrigerant Common use in restoration AR5 GWP-100 AR6 GWP-100 Change
    R-410A (HFC-32/125 blend) Most current LGR dehumidifiers ~1,924 ~2,256 +17.3%
    R-32 (HFC-32) Dri-Eaz LGR 6000i; newer units 677 771 +13.9%
    R-454B (HFC-32/HFO-1234yf blend) Next-gen low-GWP units ~467 ~530 +13.5%
    HFC-134a (R-134a) Older residential dehumidifiers 1,300 1,530 +17.7%

    Source: IPCC AR6 WG1, Chapter 7, Table 7.SM.7 (2021). EPA Technology Transitions GWP Reference Table.


    Table 7: EPA eGRID 2023 — Subregional Emission Factors for Major Restoration Markets

    The national average grid factor (0.3497 kg CO₂e/kWh, eGRID 2023) used as the RCP default understates or overstates electricity emissions significantly depending on where equipment is operated. Using location-specific subregion factors improves data quality for clients in GRESB, SBTi, and CSRD reporting contexts.

    Use the subregion factor for the state/metro where the job was performed, not where the contractor’s facility is located.

    eGRID Subregion Primary coverage kg CO₂e/kWh vs. RCP default (0.3499)
    NYUP Upstate New York 0.1101 -68.5%
    CAMX California / Western US 0.1950 -44.3%
    NEWE New England 0.2464 -29.6%
    ERCT Texas (ERCOT) 0.3341 -4.5%
    US Average National default (RCP v1.0) 0.3497 Baseline
    FRCC Florida 0.3560 +1.7%
    SRSO Southeast (excluding FL) 0.3837 +9.7%
    NYCW NYC and Westchester 0.3927 +12.2%

    Source: EPA eGRID2023 Summary Tables Rev 2 (published March 2025). Full subregion table available at epa.gov/egrid. A California restoration contractor using the national average overstates electricity emissions by 44%; a Florida contractor understates by 1.7%. The difference is largest for multi-week jobs with sustained equipment energy consumption.


    Table 8: PPE and Consumables — LCA-Sourced Per-Unit Emission Factors

    The EPA EEIO proxies in Table 2 are sector-level estimates. The following values are sourced from published lifecycle assessments and Environmental Product Declarations for specific product types. Use these in place of the EEIO values where the product type matches.

    Item Unit kg CO₂e Source vs. EEIO proxy
    Nitrile glove (3.5g, size M) Each 0.0277 Top Glove LCA 2024, SATRA-verified -82% vs. EEIO pair proxy
    Nitrile glove pair Pair 0.0554 Top Glove LCA 2024 -82% vs. current 0.3 EEIO
    N95 respirator (disposable) Each 0.05 Springer Env. Chem. Letters 2022 -88% vs. current 0.4 EEIO
    DuPont Tyvek 400 coverall (180g HDPE) Each 0.40–0.63 Estimated: 180g × 2.2–3.5 kg CO₂e/kg HDPE -47–65% vs. current 1.2 EEIO
    LVP/LVT flooring (Shaw EcoWorx) 5.2 Shaw Contract EcoWorx Resilient EPD 2023 Consistent with WARM v16 plastics
    Ceramic tile (standard) kg 0.78 ICE Database v3.0 (University of Bath) More granular than WARM v16 inert
    Ready-mix concrete (30 MPa) kg 0.13 ICE Database v3.0 132 kg CO₂e/m³
    Polyethylene LDPE sheeting kg 1.793 DEFRA 2024 (closed-loop recycling scenario) Use as proxy for virgin LDPE sheeting
    H₂O₂ antimicrobial (active ingredient) kg active 1.33 ACS Omega 2025 (anthraquinone process) Lower than EEIO chemical proxy

    Note on Tyvek: DuPont has not published an independent lifecycle assessment for standard Tyvek 400 coveralls. The value above is estimated from HDPE production emission factors. DuPont has commissioned an LCA for Tyvek 500 Xpert BioCircle (a recycled-content variant) claiming 58% reduction versus standard Tyvek, which implies a quantified baseline exists internally. The RCP will update this value if DuPont publishes the underlying LCA data.

    Note on nylon carpet (DEFRA 2024): The DEFRA 2024 value of 5.40 kg CO₂e/kg for nylon carpet should be verified against the actual DEFRA 2024 full spreadsheet to confirm whether this represents virgin nylon production or a closed-loop recycling scenario. DEFRA 2024 uses AR5 GWP values throughout.


    Factor Vintage and GWP Basis: Version Disclosure

    RCP v1.0 uses the following factor vintages:

    • Electricity: EPA eGRID 2023 (published March 2025)
    • Mobile combustion / vehicle fuels: EPA 2025 Emission Factors Hub
    • Waste disposal: EPA WARM v16
    • Refrigerant GWPs: IPCC AR6 (2021)
    • Materials (non-EEIO): ICE Database v3.0, EPD-sourced, DEFRA 2024
    • Materials (EEIO proxy): EPA USEEIO v2.0
    • GWP basis: AR6 GWP-100 for refrigerants; AR5 GWP-100 for all other gases (consistent with EPA GHG Inventory basis)

    When factors are updated in patch releases, the factor vintage table updates accordingly. All RCP Job Carbon Reports should reference the schema_version field (RCP-JCR-1.0) which implicitly references the factor table version used at calculation time. For year-over-year comparisons, use the same factor vintage across both years unless a major correction justifies restating prior-year figures.